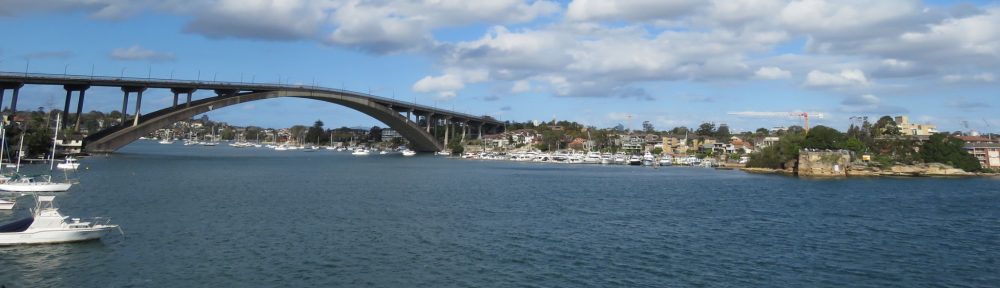
By chance, I was near the banks of the Parramatta River at Henley, near Gladesville. The road curves down to the ferry wharf and near the ferry terminal there was a small pocket of grass, surrounded on three sides by sandstone blocks. In the middle was a plaque outlining the original location of the first Gladesville Bridge. Across the river at Chiswick/Abbotsford, it is possible to see the abutment where the bridge joined the land.

The concrete span of the Gladesville Bridge is iconic and is recognised internationally as a significant engineering achievement. Depending on the angle, it seems to curve up and over the river, the high arch ready to accommodate the largest shipping vessels. A couple of years ago there were an estimated 81,000 cars crossing the bridge each day; a figure that will only increase. Ruth Park described the bridge as follows:
One is somewhat comforted by the lean elegance of the Gladesville Bridge. It gives the agreeable illusion that the road rushes up to the water’s edge and takes off in a 305 metre leap with Olympic ease, landing like a butterfly and whisking away in a harmonious curve over Huntleys Point. (Ruth Park’s Sydney, p. 190).
Photos of the original bridge, opened in 1881, provide a clear indication of the burgeoning growth of Sydney, and of road traffic in particular. The original bridge accommodated two lanes of traffic and a tram line, installed later. It had five spans with iron pylons and the centre span was a swing span, used to open up the bridge for the passing water traffic. This provided two channels for shipping to pass through, including ferries and the colliers travelling from Newcastle to the Mortlake Gas Works. The channels were relatively narrow and were often knocked about by ship masts and at times the swing bridge could not be closed or could be closed but the tram lines required realignment. There was no pedestrian access on the bridge: pedestrians were given free passage on buses and trams in order to cross the river.

By the early decades of the twentieth century, the bridge was not coping with the increased demands of traffic. A browse of letters to newspaper editors in Trove includes regular complaints about the inconvenience caused when the bridge was opened for ferry access (disproportionate when the number of ferry passengers was compared to the road traffic that had to wait whilst the bridge was opened and closed). There were also functional issues. When the weather was very hot, parts of the bridge would swell and the expanding metal needed to be sprayed by tugboats in order to contract. As Sydney traffic increased, access to the bridge was limited to the city-bound traffic of a morning for blocks of time. A new bridge was desperately needed.
In 1957 the tender for the bridge design from G Maunsell & Partners (Engineers, London) was accepted and work commenced in 1960. The location of the bridge was carefully considered based on the local topography. Another consideration was the bridge clearance height: heavy industrial shipping was expected and the bridge height in the centre was set at forty metres above mean high tide.

The bridge was originally planned to be part of a north-western expressway along with Tarban Creek Bridge and Fig Tree Bridge for the northern suburbs of Sydney. This project was abandoned in the 1970s due to protests about the projected freeway route through inner city suburbs including Annandale and Glebe. The construction of the Gladesville Bridge had a significant impact on the local area, including Hunters Hill which had approximately 100 houses and public buildings compulsory resumed and destroyed. There is an excellent article on the attempt to save one of the historic houses, St Malo, here.
The original arch span for the new bridge was extended slightly to 1,000 feet: there were aesthetic and prestigious reasons for doing this. At the time of its construction, the bridge was the longest single span concrete arch ever constructed. Its design was simple yet the scale of the arch was extraordinary at the time.
Taking inspiration from the Roman method of building arches using segmented units built over a temporary formwork, the engineers used hollow, precast concrete blocks which were moved into position via a railway on top of the formwork. (Source: Engineers Australia)

In 2015, the Gladesville Bridge was declared an International Historic Civil Engineering Landmark by the American Society of Civil Engineers. At the time, it shared this honour with three other Australian landmarks: the Sydney Harbour Bridge, the Western Goldfields and the Snowy Mountain scheme. When the plaque was unveiled at NSW Parliament, the original engineer, Tony Gee was in attendance. Gee was 22 years old when he was given the task of designing this extraordinary bridge.

There is a wonderful oral history available on the background and construction of the Gladesville Bridge. The history was compiled by the Roads & Traffic Authority Environment and Policy branch in December 2000 by Martha Ansara and Frank Heimans. It includes recollections from people involved in the bridge design and construction, as well as locals who watched the bridge come into existence. It recalls the excitement of the bridge opening on 2 October 1964 by Her Royal Highness Princess Marina. There are interviews with some of the characters who worked on the bridge, including insights into health and safety at the time. One interviewee estimated the lifespan of the bridge at 100-200 years.
When was the last time a chance encounter triggered a fresh look at something familiar for you?
[Photo: Gladesville Bridge viewed from Henley]


Leave a comment